Showing posts with label Birthday card. Show all posts

Friday, 9 December 2011

Masculine Birthday Cards

An almost totally festive free post today, instead, more masculine cards to share with you made to celebrate a milestone birthday. The first one uses an idea I saw on Vicky's blog using the amazing Autumn Days stamp set - how versatile is this set, how clever is this lady?


Using the sponging technique again, I built up the layers to form the ground then stamped the shrubbery by stamping off some of the ink first onto paper before stamping directly onto the card to create a misty morning effect. Lets have a closer look....


Lots of these little fellas about at the moment


Faded shrubbery


..... and another card where I got the idea from this sketch from the wonderful Clean and Simple site.


Masculine cards needs a bit of tearing...


Happy birthday to my BiL


We went out to buy our Christmas tree today so I'll be up in the loft scurrying around to find the decorations later.


A satisfying .........ahhhhh


...then........ on with the Christmas music, wine in hand to decorate the tree and sing Christmas Carols around it with my family.....POP!!!!!   Reality check!!!!   Wrestle with the lights, curse profusely when I can't get them to work, try to stop the cats from climbing the tree, smile sweetly when those members of my family have 'helped' by putting a few decorations on the tree and then found something else that they urgently need to do, then sweep up all of the needles that have fallen off my needlefast tree in the process of me decorating it :) 

Hope you have a great weekend x


Wednesday, 23 November 2011

Autumnal birthday card

You will only have to open the door to your house and step outside to see where the inspiration for the colours on this card came from. Isn't nature wonderful?

Although the last few days have been a bit grey and grim, this morning I've woken to a crisp white frost and a blue sky.

This card is made for a birthday using rich Autumnal colours and it gave me a chance to use 'the leaf' from my newly purchased 'Autumn Days' stamp set (Stampin' Up).


A birthday card for my Auntie


Falling leaves in vibrant colours on co-ordinating card stock.......


.......and a punchy sentiment in a deep cherry red.


Have a good day everyone and thanks for stopping by.


Saturday, 19 November 2011

Crochet Hearts, a birthday gift set and a crochet catch up.

When I started my little crochet adventure back in April, never in my wildest dreams did I ever imagine that I would be making a birthday present for a friend that involved crochet. OK what I've done is very simple but I think very effective and should encourage all you novice crocheters (like me) out there to have a go.

Ooooooh what are these......?


My very good friend is celebrating her 'girlie' birthday this week. She is a lover of all things 'hearty' and has an excellent eye for detail, creating lots of interesting little corners in her house. Anyway the 'hearty' thing was my starting point.


So where do you go when as a crochet novice you need a bit of handholding and advice? Off to lovely Lucy of course, where there was a lovely teeny tiny heart tutorial which was just perfect for my needs.


The hearts were so straightforward to make and I had purchased a white box frame for them to nestle into.


But then of course I had to make the card and think of a suitable wrapping. Here's what I came up with.


A tote'ish bag made from good old reliable wallpaper lining to house the frame, using hearts as my theme and working with the same colours as the crochet hearts.  Shall we have a closer look......?


A carefully placed sentiment and hearts randomly stamped onto a strip of white card which were then cut into squares and mounted onto card. I wanted a faded heart look, so I stamped some of the ink off before stamping onto the white card.


This might give you a better idea....


The ribbon was simply tied around the handle and the handles were made from red card and attached with eyelets.


Although this was for a birthday, what a great Christmas present it would make wouldn't it?


And talking of all things crochet, just in case you were wondering...............


........my crochet blanket is coming along nicely. I left off it for a few weeks as sewing projects took over but I'm determined to get it finished in time for Christmas. I'm aiming for a 10 squares by 12 rows blanket and I'm on row 10 now, I should make it shouldn't I?


Enjoy your day and thank you for stopping by x


Wednesday, 2 November 2011

Birthday Card

Morning! Gosh it took me ages to come up with a title for this post!:)

A couple of cards to share with you today, both with a strong masculine feel.


Happy Birthday Dad!


Linen thread tied through a button


This close up allows you to see the' tearing technique' I guess it's the male version of the 'scalloped edge' on a feminine card and I love it's rough and readiness. Although my friends will tell you the first time I had to 'tear' for a scrapbook page was a complete disaster, I just couldn't get my head around which way to tear, much to the amusement of those around me. In the end I think you just have to go for it.


Horizontal stripes this time and a little more red just to make things 'pop'.


What could be nicer than co-ordinated cards?

Have a good day x


Wednesday, 26 October 2011

More scrappy beach huts

Last week I mentioned that I was going to be making a fabric picture of beach huts for my lovely friend's birthday. I know that some of you are big fans of beach huts and indeed some of you are lucky enough to live by or near to the sea. Well, after a trip to the North Norfolk coast, my friend was inspired to makeover one of the rooms in her house using colours with a definite seaside feel and that was my starting point.

I had recently made a cover for a footstool for her,


Not the most inspiring of photos - sorry


......which I was really pleased with, but wouldn't be in a rush to repeat the experience as my poor sewing machine struggled to cope with all those layers of fabric. A no nonsense bruiser of an industrial machine would have coped much better . The footstool belonged to the sofa in 'said' room.


Lots of layers of fabric here


Anyway the point of me mentioning this is to say, I remembered I had some scraps left over from this project and I decided to use one of them as the background for the picture. A lovely, ribbed heavy cotton furnishing fabric in a neutral sandy colour, perfect!


Then came the usual playing around with colours and I did have fun with this one. Getting the combination right and waiting for that 'pop' moment. The weird thing was that when I gave the present to my friend she squealed out loud, as the blue in the picture is the exact same fabric that she also has on one of the cushions in 'said' room. What a coincidence!!


I must admit I loved the way these colours came together and will I ever stop loving this applique thing? I chose a clean white frame to set the picture off.


Then the wrapping. Regular readers will know I enjoy a good bit of papercrafting. I made a box to house the picture and decorated it very simply with white ribbon, linen thread and a co-ordinated gift tag.


Poor picture - sorry


Let's have a closer look.........


Little bit of sponging on the background and around the edge, you can just see it if you look carefully

It was lovely to see the delight on my friends face when she opened up the box and I've seen it in it's new home and she's right it co-ordinates beautifully.


Well, I certainly feel like a bracing walk along a beach this morning, so I envy you if that's on your agenda but whatever you've got planned for today hope you enjoy it and thank you for visiting and saying hello.


Wednesday, 28 September 2011

Card fest & less is more challenge

Hello to you all. Today I have more cards to share with you and I'd like to show you a new technique I've used which is really easy but very effective.

First of all two cards I made for my lovely MiL's recent birthday


From us

From the boys

Let's zoom in on that sentiment...


Happy Birthday

This is the card that I tried my new technique on. All credit must go to Vicky for this one, she likes to use this technique alot and after seeing one of her latest creations I was inspired to have a go.


For a 96 year old lady - My Nan!

I think you can see the sponging a little better and the stamped image on this zoom in shot.
It involves lightly sponging ink (from an ink pad) very subtley onto the card to form the basis of a background, in this case the foreground of grass and the sky overhead. Then when you're happy with this, simply stamp floral images over the top to achieve a hedgrow type of effect. I finished by adding a sentiment to the sky (try to align it a little more carefully than I have done here) and tiny cut-out butterflies - on dimensionals to make them stand up from the card. Hey presto! Very simple to do but a lovely effect. I had such fun playing with this idea and as is usual once you try something you start to imagine all sorts of possibilities. Let me share a few of Vickys inspiring creations with you, which use this technique.Here , here and here

Finally, I saw this sketch on the Less is More challenge this week and couldn't resist having a go.


I made two cards but I'm only entering one as I'm not sure my floral card fits their strict guidelines, but I'll show you both.

The first definitely has a Cath Kidston flavour to it. I punched out three flowers, layered them and curled in the edges. I then very lightly sponged the edges in a rich red colour to give them more definition, once again something I picked up from Vicky.


Ooops a missed birthday

Pretty flower

A card for a young man who has just turned 14
I really like this one. It's so hard to make a card with a masculine feel so when you get one that hits the spot it feels so good. This is my entry for the challenge and the eagle eyed amongst you will see I've been busy with my sizzlet die again. Look at the colours aren't they great, so earthy and apt for this time of year.


A monogrammed card - very masculine!

Well it's my Cinderella morning so I'm off to do horrid things with a duster and a vacuum cleaner, then a coffee and some sewing.

See you soon.


Thursday, 15 September 2011

Fun with My Big Shot - Sizzlit die

Now there's a catchy title if ever there was one! Welcome to  another post, all about cards today! A few weeks ago I was lucky enough to be given a set of new dies for my Big Shot by my lovely friend. They basically consist of upper and lower case letters (courier font) with numbers  0-9 and a few little added extras, like a button (squeal!) a heart and an @ sign to name but a few. Boy did I have fun! I can only show them to you now as everyones birthdays have passed. Take a look......


For my amazing mum!


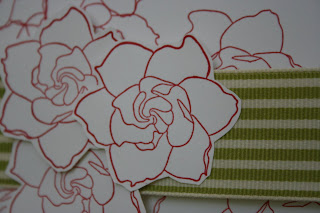
Roses stamped in red ink, cut out and laid onto a beautiful striped grosgrain ribbon


A card for my lovely niece


and a card for a 'best mate' who's mad about his PC
 

I've mentioned before that the Big Shot dies cut through a number of materials, however it's important to point out, before you all rush out to buy this sizzlit die, that this particular (smaller die) type seemed only able to cope with felt, I did try out on other scraps of fabric but was unsuccessful.  I love making cards and am so looking forward to getting my supplies in for Christmas, sorry I mentioned the dreaded word, but that is genuinely one of the great things I love about the build-up to the big day.

After reading yesterday's post my mum was careful to point out.....

"I hope you realise I used to have the Crystal comic every week and of course the annual at Christmas, I can even remember when it first came out, I was one of the first Crystal fans!"

So that particular find really struck a chord with her - how lovely. And that her dad, my Grandad, "was partial to a small loaf of Procea bread which was very light in texture". I knew there was some reason I was drawn to that tin! 
Now a little tease.......


A vintage fair button and a crocheted flower. Come back in a few days and I'll show you what I've been up to.